
Most homeowners focus on furniture and décor, but the walls? They’re often an afterthought. Yet walls make up the largest visual surface in any room, and transforming them can completely change the feel of a space without a full renovation. From bold paint techniques to architectural paneling, interior wall design offers practical, budget-friendly ways to add character, depth, and personality. Whether someone’s working with a rental-friendly peel-and-stick solution or ready to install real hardwood trim, the right wall treatment can turn a flat, forgettable room into something worth showing off.
Key Takeaways
- Interior wall design transforms rooms cost-effectively by focusing on walls—the largest visual surface—through paint, paneling, and textured treatments rather than expensive renovations.
- Bold paint techniques like color blocking and ombré, combined with textured treatments such as shiplap and beadboard, add depth, character, and architectural interest to any space.
- Peel-and-stick wallpaper and removable options make wall design accessible to renters, while traditional wallpaper and custom murals offer durability for permanent installations.
- Architectural elements like picture frame molding, crown molding, and wainscoting panels give builder-grade rooms high-end character with proper measurement, preparation, and the right tools.
- Gallery walls and creative art displays require careful planning—layout on the floor first, proper wall anchors for weight distribution, and varied frame sizes for visual interest.
- Preparation is essential for professional results: clean surfaces, accurate measurements, primer on fresh drywall, and safety precautions when cutting materials or using power tools.
Why Interior Wall Design Matters More Than You Think
Walls set the stage for everything else in a room. A well-designed wall can define zones in an open floor plan, draw the eye upward to make ceilings feel taller, or anchor a room’s color palette. It’s also one of the most cost-effective upgrades. Paint runs around $30–$50 per gallon (covering roughly 350–400 square feet with one coat), and even higher-end treatments like paneling or wallpaper often cost less than replacing flooring or cabinetry.
From a resale perspective, intentional wall design signals that a home has been maintained and thoughtfully updated. Buyers notice cohesive color schemes, quality finishes, and interesting architectural details. Even renters can make an impact with removable options, peel-and-stick wallpaper, washi tape grids, or temporary paneling systems that won’t violate a lease.
That said, not all wall projects are created equal. Cosmetic changes like paint or wallpaper are straightforward DIY tasks. But cutting into drywall for built-in shelving, installing heavy paneling that requires blocking, or removing walls altogether? Those may need permits and a structural assessment, especially in older homes where load-bearing walls aren’t always obvious.
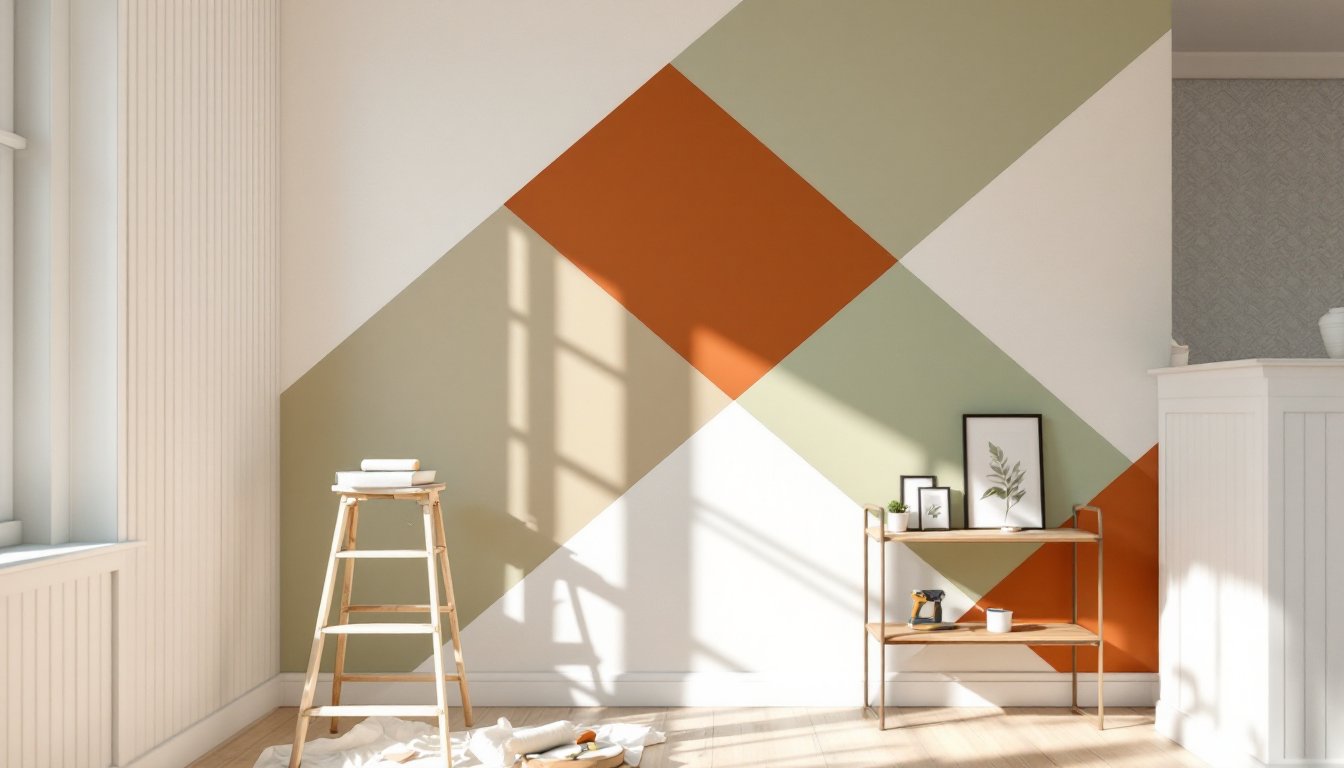
Bold Paint Techniques and Color Blocking
Paint is the gateway drug of wall design, affordable, reversible, and endlessly customizable. But there’s more to it than rolling on a single color.
Color blocking divides a wall into geometric sections using painter’s tape and contrasting hues. It works especially well in kids’ rooms, home offices, or dining areas where a little visual drama won’t overwhelm. Use a laser level or chalk line to keep lines crisp and straight, freehand rarely ends well. Apply the lighter color first, let it cure for 24 hours, then tape off and apply the darker shade. Remove tape while the top coat is still slightly tacky to avoid peeling.
Ombré or gradient walls blend two or more colors from floor to ceiling. This technique requires wet-blending with a brush or sponge while the paint is still workable, so it’s best for smaller accent walls. Use a satin or eggshell finish rather than flat: the slight sheen helps colors blend more smoothly.
Half-wall treatments (also called “picture rail” or “chair rail” designs) split the wall horizontally, darker below, lighter above, separated by trim. Install a 1×3 or 1×4 pine board at roughly 32–36 inches from the floor, depending on ceiling height. Secure it to studs with finishing nails and caulk the seams before painting. This approach works well in traditional or transitional spaces and can visually lower a too-tall ceiling.
Always use primer on fresh drywall or when making a drastic color change (dark to light or vice versa). It improves coverage and adhesion, saving paint and time.
Textured Wall Treatments for Depth and Drama
Flat drywall is fine, but texture adds a tactile quality that paint alone can’t deliver.
Venetian plaster is a smooth, polished finish that mimics limestone or marble. It’s applied in thin layers with a trowel, then burnished to a soft sheen. Kits are available at most home centers, but the technique has a learning curve, practice on scrap drywall or in a closet first. Wear nitrile gloves and a dust mask: the material is alkaline and messy.
Shiplap and tongue-and-groove paneling add horizontal or vertical lines and work in farmhouse, coastal, or Scandinavian interiors. Real wood shiplap (often 1×6 or 1×8 pine) can be nailed directly to studs or over drywall if studs are located and marked. For a budget option, use 1/4-inch plywood ripped into planks with a table saw or circular saw and a guide. Paint-grade MDF is another choice if the wall won’t see moisture. Always allow wood to acclimate in the room for 48 hours before installation to minimize expansion and gaps.
Board-and-batten creates a grid of vertical boards with a cap rail and baseboard. It’s a classic look that hides imperfect drywall and adds architectural interest. Use 1×2 or 1×3 boards spaced evenly (12, 16, or 24 inches on center, depending on the look). Attach them with a brad nailer and construction adhesive, then caulk seams and paint.
Beadboard is a type of paneling with narrow, vertical grooves. It comes in 4×8 sheets or individual planks and is commonly used as wainscoting in bathrooms, mudrooms, or kitchens. Install it with panel adhesive and finishing nails, then seal with semi-gloss or satin paint in moisture-prone areas.
Safety note: Cutting MDF or plywood generates fine dust. Use a respirator (not just a dust mask) and work in a ventilated space or outdoors.
Statement Wallpaper and Murals
Wallpaper has come a long way from the floral prints of the ’90s. Today’s options range from bold geometrics to photorealistic murals, and installation is more DIY-friendly than ever.
Peel-and-stick wallpaper is ideal for renters or commitment-phobes. It’s repositionable, leaves no residue, and comes in thousands of patterns. Application is straightforward: clean the wall, measure and cut panels, peel the backing, and smooth from top to bottom with a plastic smoother or credit card to avoid bubbles. It works best on smooth, painted drywall, textured or freshly painted walls (less than 30 days old) can cause adhesion issues.
Traditional paste wallpaper offers more durability and a wider range of high-end designs. It requires wallpaper paste, a smoothing brush, and a seam roller. The prep is critical: fill any holes, sand rough spots, and apply a primer-sealer designed for wallpaper to ensure the paper doesn’t peel or bubble. Match the pattern at seams carefully, most patterned papers have a repeat distance listed on the label.
Murals make a dramatic statement on a single accent wall. Pre-pasted murals come in panels that align to form one large image. They’re especially popular in kids’ rooms, home theaters, or behind a bed as a headboard alternative. For a custom look, some companies print murals from uploaded photos, though resolution and image quality matter, low-res photos look pixelated at wall size.
One caution: removing old wallpaper is a pain. If the plan is to sell or redecorate in a few years, stick with peel-and-stick or paint.
Architectural Elements and Paneling
Adding trim, molding, or paneling can give a builder-grade room custom-home character.
Picture frame molding creates recessed rectangles or squares on a wall, mimicking wainscoting or traditional panel detailing. Use 1×2 or 1×3 pine, cut with a miter saw at 45-degree angles for crisp corners. Map out the layout with painter’s tape first to check proportions. Attach with a brad nailer and adhesive, then caulk, prime, and paint. This works especially well in dining rooms, hallways, or above a fireplace.
Crown molding bridges the wall and ceiling, adding elegance and visual height. It’s one of the trickier DIY installs because of the compound miter cuts required at inside and outside corners. A compound miter saw is almost essential, cutting crown with a circular saw or hand saw rarely ends well. Cope joints (cutting the profile of the molding to fit snugly against another piece) are stronger and cleaner than mitered inside corners. Plenty of online tutorials walk through the process, but expect a learning curve and some wasted material on the first attempt.
Wainscoting panels cover the lower third of a wall, traditionally 32–42 inches high, depending on ceiling height. Raised-panel wainscoting kits are available at home centers and come with rails, stiles, and panels that fit together like a puzzle. Installation involves locating studs, leveling the rail, and securing with finishing nails. Top it with a cap rail or chair rail for a finished look.
Coffered ceilings are technically a ceiling treatment, but they tie into wall design when columns or pilasters are added for a full architectural effect. This is advanced carpentry, consider hiring a finish carpenter unless you’re comfortable with precise measuring, cutting, and assembly.
Always wear safety glasses when using a miter saw or nail gun. Flying wood chips and misfired nails are real hazards.
Creative Gallery Walls and Art Displays
Gallery walls turn a blank expanse into a curated display, and they’re one of the most flexible wall design options.
Start by laying out the arrangement on the floor. Mix frame sizes, orientations (landscape and portrait), and styles for visual interest. A good rule of thumb: keep 2–3 inches between frames. Use painter’s tape on the wall to map the layout before hammering a single nail.
Hanging methods matter. For lightweight frames (under 10 pounds), a single picture hanger nail works. For heavier pieces, use wall anchors or locate a stud. In drywall, toggle bolts or molly bolts distribute weight better than plastic anchors. For a damage-free option, adhesive picture strips hold surprisingly well, up to 16 pounds per set of strips, and remove cleanly.
Picture ledges or floating shelves offer flexibility. Swap art seasonally without new nail holes. Install ledges with L-brackets secured to studs, or use heavy-duty anchors rated for the shelf’s weight plus the frames. A level is non-negotiable here: a crooked shelf is immediately obvious.
Grid layouts work well in modern or minimalist spaces. Use identical frames and equal spacing for a clean, symmetrical look. For salon-style or eclectic galleries, vary the frame styles and let pieces overlap slightly (visually, not physically).
Don’t limit gallery walls to framed art. Plates, woven baskets, small mirrors, or sculptural objects add dimension. Just make sure wall anchors are rated for the weight, ceramic and metal are heavier than they look.
Conclusion
Interior wall design isn’t just decorative, it’s one of the highest-impact, lowest-cost ways to change how a room feels and functions. Whether someone’s taping off a color-blocked accent wall, nailing up shiplap, or hanging a gallery of family photos, the key is preparation: clean surfaces, accurate measurements, and the right tools for the job. Walls are forgiving canvases. With a little planning and patience, even a beginner can create a space that looks intentional, polished, and a lot more expensive than it actually was.